Wednesday, March 31, 2010

Baby's First Spring Dress


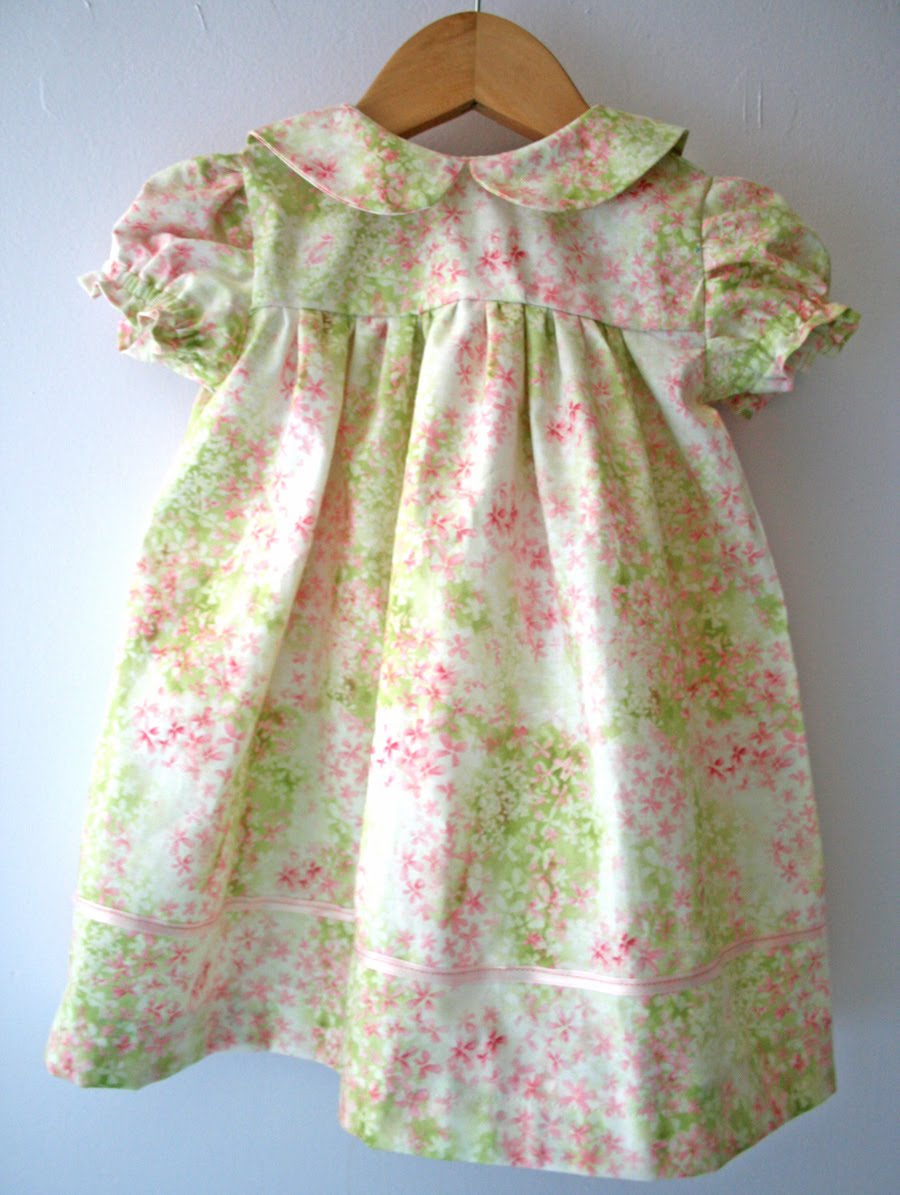
Since this will be my little girl's first Easter and my sewing skills are pretty good now, I decided I'd make her a fancy spring dress. I'd bought the fabric & pattern a while ago at Joann's when they were on sale.   I liked the classic style and that the pattern also included optional bloomers, hat and pinafore.  


I'm really pleased with how it turned out, but I'm 50/50 on whether I'd use this pattern again. It's Simplicity 4709.  It just seemed overly complicated step-wise even though the dress doesn't look like it. Doing the back (where it opens part way via buttons or snaps) and the inner finishing of the collar could have been a lot simpler than they designed it.


 It has this lap thing that means you have to fold over fabric and stitch a lot just to make the back opening wide enough to get it on & off.  I'd probably just make it open all the way down the back next time to save some sanity which is also easier for dressing.   It's also really long, so I'm glad I didn't bother making the matching bloomers as they wouldn't be seen at all, but  I added a little ribbon I had on hand at the bottom for a finishing touch.  She seems to like it:


Now I can't wait for Easter!

Monday, March 29, 2010

Easter To A Tee (Shirt)


Every spring I run into the same dilemma for Easter clothes for my guys. For girls there are loads of cute little outfits, but for boys it's pretty much sweater vests & button-up shirts in pastel colors. While some of these are cute the reality is it's a waste of money for me. Other than Easter when would they wear something that dressy? They don't go to polo matches, play golf or have a house in the Hamptons.  So I thought up these t-shirts that are ideal for Easter, a little cheeky, can be worn to play outside and cost less than $5.


I got these blanks t-shirts at Michaels (2 for $5) and used scrap fleece to make my appliques.   Fleece is great because it doesn't fray, is easy to work with & adds texture.


For "Bunny Hop" I freehand drew a bunny shape based on some Easter pjs I saw in a catalog (they were $48! Really now, who is buying those??). I cut out the word hop and stitched all those on using varigated pastel thread.  I added a nose & eye with embroidery floss.


I wanted a cute design for my 7yr old that didn't seem too babyish,  so I drew up this little chickie & magnet, stitched them on and added a button for the eye.  Cheeky for the chickies indeed! 

I paired these with some khakis I made last year from my husband's old pants and look at my hip Easter fellas:


Chicky says what?  $5 for 2 Easter Outfits?  What a deal!  Now, don't worry baby fans, I'm not leaving my little girl out.  I've made her a dress too, so that & my review of the pattern used will be up soon. 


Sharing with:
The Girl Creative's Just Something I Whipped Up
Somewhat Simple's Strut Your Stuff Easter & Spring
Life As Lori's Spring/Easter Party
Making The World Cuter Monday
Sumo's Sweet Stuff's Market Yourself Monday
Delicious Ambiguity's Tot Tuesday
My Frugal Family's Talented Tuesday
The Thrifty Home's Penny Pinching Party
Someday Crafts Whatever Goes Wednesday
Me & My Bucket's Show Us What You're Working On
Women Who Do It All's Idea Sharin' Wednesday 
733's What Are Little Boy's Made Of

Thursday, March 25, 2010

Felt House Along: The Revealed House!

My Shop Around Felt Playhouse is done! Yay!! My kids have tried it out and I'm happy to say it's a hit.  They love having their names on the "shops" & have spent more time playing in and out of it than anything else lately.  Definitely worth the time & effort spent.  Here's a little tour:


The Market has the front door (complete with reversible Open/Closed sign), a removable shopping bag and pickable fruits, veggies & flowers.  I made all the produce from felt & fleece (the flowers were courtesy of the dollar section at Target).


The Ice Cream Shop has a removable "cooler" filled with felt ice cream cones & popsicles that can be served through the window.  Who ordered the chocolate?


The Post Office has a mail bag (complete with removable addressed letters), velcro-on stamps and letter box.


A busy little postman on the job:


The Bank Drive-Thru has a teller window with roller shade, deposit slot and ATM.  Someone's looking to make a withdrawl:


The money man sharing the wealth:


And a little happiness:


I've appreciated all the encouraging comments over the past few weeks as it's come together and have been incredibly flattered that some people have been inspired to make their own Shop Around Playhouse based on my playhouse plan.  I've enjoyed sharing how I made it and I would LOVE to see how any of them turn out!   Obviously my design is for personal use, not for resale (playing in it yourselves is the best part anyway!).   I'm really glad Fawnda over at Fireflies & Jellybeans came up with the idea to do a felt house along each week - it made a large project a lot more manageable, so a big thanks to her for the encouragement, now off to do a little shopping;)


Tuesday, March 23, 2010

Excellent Easter Gifts: DIY Silly Putty & Squashy Eggs


Every Easter we do a little gift bag for my niece & nephew and they do the same for our kiddies. I try to come up with fun themed items, but I wanted to do something a little unique this year. I mean how much candy, plastic trinkets & egg shaped balls can a kid have (or a parent stand for that matter)? Enter these easy homemade goodies: DIY Silly Putty & Squashy Eggs.

For the putty, you just need white glue, liquid starch & food coloring.


To make enough for a plastic egg, the recipe calls for 2tbl glue mixed with 1 tbl starch and a few drops of food coloring. Personally, I used a heck of a lot more starch because it was way too watery with just 1 tbl of it, so I recommend adding a bit at time until it seems right.  You'll have to knead it quite a bit to get it nice & thick.  It's a little more slimy than rubbery, but that probably makes it more appealing for kids anyway.  Pop it into some plastic eggs (and who doesn't have some of these lurking around the house!) and now it's Easter ready.


The squashy eggs are just like those stress balls for grownups. Hmmm....I may need to make an extra one for me.  Just take a balloon &, using a funnel, fill with 1/2 cup of sand or cornstarch.


 Carefully squeeze out the air & knot balloon. It's not exactly an egg, but close enough. 


I'm also going to make a few carrot & bunny shaped chocolate suckers with colored melt wafers (using molds I bought last Easter).   Just melt in the microwave and pour.  Original, inexpensive & fun for the kids.  Yay for an easy Easter!  


Sharing with:
Somewhat Simple's SYS Easter & Spring
Talented Tuesday @ My Frugal Family 
The Girl Creative's Just Something I Whipped Up
Childmade 
Tot Tuesday @ Delicious Ambiguity
Market Yourself @ Sumo's Sweet Stuff
Today's Creative's Get Your Craft On
Blue Cricket Design's Show & Tell
Easter Party @ Holiday Haven
The Thrifty Home's Penny Pinching Party
Show Us What You're Workin' With @ Me & My Bucket
Someday Craft's Whatever Goes Wednesday  
Somewhat Simple's SYS
Get Your Craft On @ Life As Lori  
Fireflies & Jellybeans SOYS

Monday, March 22, 2010

Easy Easter Decor


Easter is coming up fast and I love the happy colors & spring themes everywhere.  Not loving the pricey stuff in the store though.  But, lucky for me, I found these fun DIY ideas instead.  The ribbon topiary tutorial was something I saw on Brown Paper Packages.  Easy for even the non-crafter - just cuts ribbon strips and loop them onto the foam ball with pins.  I only bought the foam balls & some clearance bin ribbon, so it was pretty cheap too.  I repurposed some pots I had tucked away & borrowed some moss from another pot in the house.  I was too lazy to paint the dowel rods so I wrapped them with seam binding and used some of the extra to fill in some sparse areas of the balls.  It will be fun to make more of these for different seasons - especially when off-season ribbon costs next to nothing.


I saw a lovely terrarium idea on Melanie's Whimsical Creations that literally made me run out to get one of these glass jars.  Hers are decorated with some of the adorable clay creations she makes.  She's got a shop on Etsy where you can buy some of them and they are sooo pretty to look at.  I do not have those amazing sculpting skills and was a bit impatient to get this made, so I got a little Easter bouquet, stuck it in some florist foam and surrounded it with some pretty fake eggs.


So after Easter,  you just save these baubles for next year and put in some new items.  I can't wait for Christmas with some fake snow in there.  Added bonus for those of us with kids and/or pets is the containment of said items, so you can finally put out the little decorations that would normally get knocked down, broken, eaten, etc.  and know that they and your little mess makers will both be safe from each other.


I apologize for my less-than-stellar photography.  The entryway these are in is crazy bright thanks to my front doors and I really wanted to take pics of them "in-situ" since they looked so pretty on the table in my entryway.   The better photos are courtesy of my husband.  I wish you could just walk in my front door and see them in-person instead (ignoring the major mess everywhere else of course). 


Sharing with:
The Girl Creative's Just Something I Whipped Up
Making The World Cuter
Made By You @ Skip To My Lou 
Market Yourself Monday @ Sumo's Sweet Stuff 
Talented Tuesday @ My Frugal Family 
Life As Lori's Spring/Easter Party
Blue Cricket Design's Show & Tell
Easter Party @ Holiday Haven
The Thrifty Home's Penny Pinching Party
Show Us What You're Workin' With @ Me & My Bucket
Someday Craft's Whatever Goes Wednesday 
Somewhat Simple's SYS
Get Your Craft On @ Life As Lori 
Fireflies & Jellybeans SOYS
Lynette's LAM Easter Decor Party

Thursday, March 18, 2010

Felt House Along Week 5 - Post Office


This week I worked on the 4th side of my felt playhouse, the Post Office.  I designed it so that addressed letters could be pulled out of the mail bin, stamped and popped into the post box.  Here's how:

 I started with cutting out the main shapes, stitching on the lettering and the mail bin for storing the "letters". 


I used my trusty printer fabric sheets to make the stamps & letters look realistic.  This item has become one of my favorites - whatever you can print on standard 8.5"x11" paper, you can print on these cotton sheets.  I get mine at Michael's (in the t-shirt making section).  I used fonts that looked like real handwriting to address the letters and stitch those onto felt "envelopes".  I also put a square of fuzzy velcro in the top right corners.


 To make the stamps I made some shapes in Open Office, printed & cut them out. 


I cut out squares of felt & smaller squares of loop velcro.


I stitched those together and then stitched the stamps on the other side of the felt.


I trimmed the edges with pinking shears and ta-da:


I stitched two big strips of fuzzy velcro onto the stamp board of the wall so the stamps had a place to hang out until they were posted on the mail.


Time to deliver the mail:)  Next week I'll be putting the house together and finishing the fun add-ons for the other sides.  I can't wait to have it ready for playing in!


Sharing with:
Poppies At Play's Creative Cats
Thursday's Treasures @ Treasure For Tots


Wednesday, March 17, 2010

Announcing The Giveaway Winner & A Happy St. Patrick's Day!


Look what my two little leprechauns helped make for today!  I saw this great idea over at Make & Takes.  Simple, cheap & fun.  Just paint a pot, add some pipe cleaners & gold coins and you have a lovely little pot o' gold at the end of the rainbow.  Since I'm trying to cut down on clutter, I like that everything can be reused in this decoration instead of collecting dust until next year's holiday.


I had my helpers paint the pots with chalkboard paint so with a little chalk embellishment the uses are endless.  The pipe cleaners just sit in the pot ready to be pulled out for more crafts & the coins will be used in some upcoming pirate-themed play stuff.  To add a little magic, I surprised the guys by swapping out some of the plastic coins for some chocolate ones.

And now, announcing the winner of the Hairdo Hat Giveaway...
 She also said:


Congrats A Little Bit of Everything!  I'm happy to say I do have a blond version of the Pretty Plaits available on Etsy (you can see a thumbnail pic to the right).  A little "Swiss Miss" anyone?  Hehe.  I want to say a big thank you to everyone who entered my first giveaway and for all the great suggestions.  I'm going to try to put together some new designs with those ideas in mind.  I do have an all-new hat 'do ready, but need to get around to taking some pics of it on my model.

LinkWithin

Related Posts with Thumbnails