Monday, February 28, 2011

Craftastic Monday - Let's Party!!


The last Craftastic Party of February - Let's make it a good one!  We'll start off by announcing the  random winner of the amber necklace giveaway sponsored by
It was Entry #97: Becca.

Congratulations Becca!!  I'll be contacting you shortly to get your info & choice of necklace.

And for everyone else, don't forget there's still a 25% discount code on ALL ITEMS at Inspired By Finn for Sew Can Do readers.  Just use: GREENHEDGEHOG, so you can still get some great amber jewelry for a fabulous price!

Now let's get to the party.  There were some pretty great projects linked up last week.  Here are a few fun ones:


How cool is this Pingu themed igloo cake by Sweetened by Kagi?   Fondant penguins are so cute!


I just love this crocheted apple coaster by Annemarie's Breiblog:


Look at this amazing filigree frame made by Suzy's Artsy-Crafty Sitcom.  Can you believe this is made from toilet paper rolls!?!?!?:


OK.  Now time for you to party!  Go ahead & link up your own creation and it might be chosen as a featured project for next week!  Here's how:

  • As long as it's crafty and made by you it's Craftastic.  Just add the link to your specific post (not the main page of your blog).
  • Grab my party button & put it on your post or blog.  The code's on the sidebar ->
  • Check out some of the other great links and share some crafty comment love.

I leave the party open until 11:59pmEST every Thursday, so there's plenty of time to add your newest creations.  Can't wait to see what you've got!


Saturday, February 26, 2011

Last Day to Enter Necklace Giveaway!


Today's the last day to enter the Amber Necklace Giveaway sponsored by Inspired By Finn.  The contest ends at 11:50pmEST tonight, so be sure to get your entries in!  There are lots of ways to get extra entries, so try your luck and you could win the amber necklace of your choice:)

Click HERE to enter & good luck!


There's also a 25% discount on ALL items just for Sew Can Do readers!  Just use the code: GREENHEDGEHOG during checkout.  


Have a great weekend & stay tuned for Monday's Craftastic Party where I will announce the winner!

Thursday, February 24, 2011

Your House As A Coloring Book


Kids going stir crazy inside 'cause winter's not over?  Need a new crafting supply?  Just need some extra fun in life? How about something that fixes all those issues?  Here's a crafty discovery I made last winter: window crayons.   They look like markers, but are thick, twist-up crayons, so no mess on hands or clothes.  And removing it is easy - just use your usual window cleaner.  How cool is that?  My kids were stunned and then thrilled when I asked if they wanted to color on the windows. 


They went wild on our big picture window:


They write on any glass surface (including mirrors), so the kids can doodle whatever they like without any worries that we'll have permanent graffiti on our house.  I would like to note that I wasn't asked by anyone to review these or compensated in any way, but these are just too fun not to share.  We found them at the local Target in the art supply section.  There are other brands out there too, but we've had the best luck with these.   

I think these would be great for adding holiday decorations to windows:


Making up games for the kids using picture frames:


Decorate small mirrors or just add a little oomf to some plain glass containers or plates:


I plan to do more of all of those....if I can wrestle them away from the kids that is. 

Sharing these creations with my FAVE LINK PARTIES too so check them out HERE!

Monday, February 21, 2011

Amber Giveaway & Craftastic Monday Party!

A number of people have asked about the yellow necklace my daughter wears in my photos.  I thought I'd tell more about it and share the opportunity to win one for yourself thanks to my sponsor: 

When my daughter began teething (and turning cranky to a new level), I did some research & discovered these Baltic amber necklaces which have been used in Europe of hundreds of years.  
Amber is a natural analgesic (pain reliever) and anti-inflammatory.  When it's worn on the skin, the skin’s warmth releases trace amounts of healing oils from the amber & these oils are absorbed into the skin to provide some relief.  Definitely sounded better than teething gels & tablets and unlike the teether toys, this wouldn't end up on a dirty floor within seconds.


At first I was a little unsure of how well this would work, but I went ahead and bought one.  When I saw that she seemed a lot less bothered even when teeth were popping up left & right, I became a believer.  

And it didn't hurt that it looks cute too.  She gets compliments on her pretty necklace all the time.  I even bought one for myself & have noticed muscle soreness is a lot less severe if I've been wearing my mine.     


I chose to shop at Inspired By Finn because they use a high quality of amber, knot their jewelry between each bead for safety and offer a large range of beautiful, natural colors, shapes & sizes.  And even if you're not looking for pain relief, who doesn't like to wear lovely jewelry?


Inspired By Finn will be giving away an amber necklace to one lucky Sew Can Do reader.  Here's how to enter:


- Visit Inspired By Finn and then come back & leave a comment saying which item is your favorite.


For additional entries (leave a separate comment for each one):
  • Become a follower of Sew Can Do
  • Become a fan of Sew Can Do on Facebook
  • Become a fan of Inspired By Finn on Facebook
  • Mention & link to this giveaway on Facebook or your blog


The giveaway will be open until 11:59PM EST February 26, 2010.  I will announce the winner on February 28, 2010. 


Want to get some amber jewelry RIGHT NOW?  Inspired By Finn is offering Sew Can Do readers a 25% discount on ALL items!  Just use the code: THEGREENHEDGEHOG during checkout.


OK.  Now time to party!  Go ahead & link up your own creation and it might be chosen as a featured project for next week!  Here's how:
  • As long as it's crafty and made by you it's Craftastic.  Just add the link to your specific post (not the main page of your blog).
  • Grab my party button & put it on your post or blog.  The code's on the sidebar ->
  • Check out some of the other great links and share some crafty comment love.

I'll now be leaving the party open until 11:59pmEST every Thursday, so there will be even more time to add your newest creations.  Can't wait to see what you've got!


Sunday, February 20, 2011

This Week's Craftastic Featured Links

Tomorrow's link party has a special giveaway so I'm sharing this week's Featured Craftastic links today so they can get the attention they deserve in their own post!  

I also wanted to say thank you to everyone who has voted for my Little Love Bug Outfit over at the Whimsy Couture Valentine Contest.  If you haven't voted, but would still like to, click HERE and pick #12:)  I'm currently in 4th place, but the voting doesn't end until Monday night, so every vote is making a difference & very appreciated!

Now here's what struck my crafting fancy from last week's party:

B Is For Boy did this super detailed little Thomas out of felt & shows how you can too:

I'm Topsy Turvy made this awesome Lego Head cake.  So cool:


How about this custom upholstered bed at Its Sew for You?  Cute!!

Drivel and Whatnot shared this uber-easy & fabulous sugar scrub.  Perfect for those last minute (and tight budget) gift occasions:


Come on back tomorrow to link up at the next Craftastic Monday party & to enter a super giveaway!!

Friday, February 18, 2011

A Little Favor....

Hey Everyone - can I ask a favor? I promise it's easy.  Remember this little outfit?


I entered the Valentine's Day Outfit Contest over at Whimsy Couture with my Little Love Bug Outfit a while back.  I figured since my outfit was my own design, the odds wouldn't be too bad.  The downside is the linky photo there looks SOOOO blurry and terrible, it just doesn't look like it does above.

I know it's a long shot to win, but if you liked it and could take a moment to head over & vote for it, it would make my day.

Just click HERE to see the contest & vote for my Little Love Bug (#12).

P.S. I have a special giveaway treat for you at Monday's Craftastic Link Party, so think of it as good karma for the giveaway if you vote;).  Thanks so much & have a great weekend!!

Wednesday, February 16, 2011

Revealing The Red Riding Hood Party


Rawrr!  Did he scare you?  Don't worry - he's a friendly wolf:


Just look, he's trying to be nice - really:


I recently collaborated with the lovely Bird of Bird's Party for a special Red Riding Hood themed party and this Little Wolf Hat (and Red's Hood) were my custom creations.

Bird came up with the Red Riding Hood Woodland Party theme, designed some adorable customizable printables and did this phenomenal photoshoot:


Look at the sweet toadstool & flower accents:

And here are my Red Riding Hood cape & Little Wolf Hat en scene:


They were such fun to do that I've added them to a special Fairy Tale section of my shop, which can be found here.  I love how the party turned out & was thrilled to find it featured over at Hostess With The Mostess!


Party Vendors and Designers:

Party Printable Design and Styling: Bird's Party
Red Cape and Wolf Hat: The Green Hedgehog
Decorated Toadstool Cookies: Allyson Jane
Chocolate Toadstools: Andie's Specialty Sweets
Photography: Bird

Read more about the entire party over at Bird's Party

Sharing these creations with my FAVE LINK PARTIES too so check them out HERE!

Monday, February 14, 2011

Valentine Craftastic Monday Party!


Welcome to a holiday-edition of Craftastic Monday!  Before we get to the party, I've got a last minute Valentine's project that's easy, fast & cheap.  My Conversation Heart Lamp.  And it can be recycled for a totally new project later.  How's that  for keeping it festive with no effort?

You'll Need:
- Glass lamp or jar (if you want to use a candle)
- Red card stock
- Cricut Machine (or exacto knife & a little patience)
- Poster putty

First I grabbed this frosted Ikea lamp sitting in my basement collecting dust. I think it cost $5 a few yrs ago.  I used my Cricut & Sure Cuts A Lot software to make the hearts the perfect size and to cut the messages within them.  If you don't have a cutter machine, you could pencil draw & then cut out the shapes with an exacto, but using the Cricut meant it took about 5 seconds.

I carefully peeled the hearts and the floating bits of the letters (the center of the B's & O) off the mat and stuck them onto my lamp with little bits of poster putty.  Switch the lamp on & custom Valentine's Day decor is in full effect!

The best part is inside of tossing this into a growing pile of holiday themed projects that have to wait until this time next year, the hearts can be peeled off & the lamp is ready for something new.

Now let's have a look at a few cool projects from last week's party:


These cute Nilla wafer girls from Flexible Dreams:


Super cute Valentine Viking Stencil & Tutorial from Boy Oh, Boy Oh, Boy!:


This amazing stroller redo from Pink Calaveras.  The transformation will wow you!

If you've been featured, be sure to grab a Featured On button from the sidebar.  Want to be featured?  Go ahead & link up your own creation and it might be chosen as a featured project for next week!  Here's how:


  • As long as it's crafty and made by you it's Craftastic.  Just add the link to your specific post (not the main page of your blog).
  • Grab my party button & put it on your post or blog.  The code's on the sidebar ->
  • Check out some of the other great links and share some crafty comment love.

I'll now be leaving the party open until 11:59pmEST every Thursday, so there will be even more time to add your newest creations.  Can't wait to see what you've got!

Wednesday, February 9, 2011

The Decorated Cookie's Sweetie Pie Tutorial


Ok yesterday we had some faux food treats, but today we've got some real sweets thanks to the cookie genius, Meaghan, of the decorated cookie.  Let's see what tasty things she's got for us now!
 
Hi again everybody! It's Meaghan from the decorated cookie. I'm so happy to be back at Sew Can Do once more with our second Valentine's Day sweet vs. sewn challenge: Faux dessert!! I made a pie. A pink pie. With a removable "crust." And when you remove the crust, the pie is filled with...

...tiny mini little bite-size chocolate heart cookies, of course. Did I fool you? No? You are too clever for me.


And I couldn't stop at pie. I had to make a little cupcake with a secret stash of cookies, too. 

Just lift the frosting top and cookies!


how to make cookie "pies" and "cupcakes"

you will need:*
dough
frosting
mini heart cookie cutter
circle cookie cutter (3-inch)
cupcake liners
fondant
food coloring (pink, white, red or preferred colors)
decorating bags
couplers
decorating tips (size "4")
rubber bands
light corn syrup
toothpicks
confectioner's sugar
rolling pin
cupcake tin
apples, tomatoes or other round fruit
Twizzlers pull n' peel red licorice 

*I used my chocolate dough, but you can use any you like. You should be able to find the circle and mini heart cutters at the craft store, perhaps as part of a fondant or cookie cutter set. Find the fondant, decorating bags (12-inch disposable plastic ones), tips, couplers and cupcake liners at the craft store. You can also purchase pre-tinted, pink fondant at the craft store. For coloring, I use Americolor soft gel pastes (Electric Pink, Bright White, Red Red). For tips on finding supplies CLICK HERE.The fruit is used only as a mold, so any comparable ball will work. The licorice is just for the cherry on the cupcake.


step one: bake your cookies
Prepare dough according to the recipe, chill, cut out mini hearts (about 20 to 25 per pie or cupcake. Yes. This is tedious), bake and let cool. Bake fewer minutes than the recipe calls for since these are so mini (about 8 minutes).
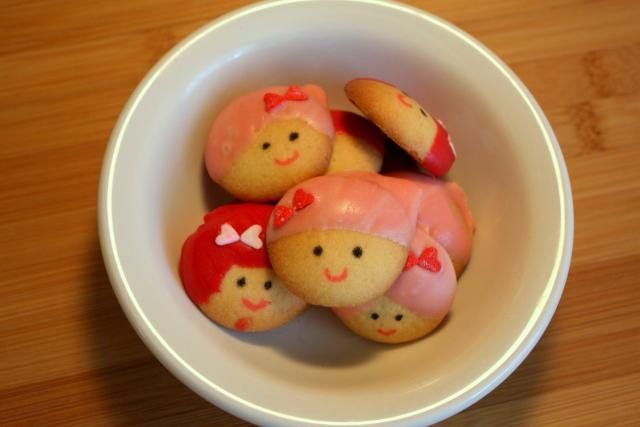
step two: decorate your cookies
Prepare frosting and tint desired colors. I used white, red and pink. Yes, you must add white food coloring to make white frosting. Prepare frosting bags with couplers and tips, fill with your colors, and tie closed tightly with rubber bands. Pipe and fill the mini heart cookies. Because they are so tiny, I held a cookie with my left hand and piped with my right. Let dry overnight. Meanwhile, make the "crust" and cupcake lid.
step three: make the pie crust and cupcake top
Tint fondant desired color, I used pink, by kneading drops of food coloring very well into the fondant. If the fondant gets sticky from overhandling, let rest at room temperature uncovered until easily pliable. Or, purchase pre-tinted fondant. Roll out fondant on a surface dusted with confectioner's sugar to prevent sticking. Cut out a 3 inch circle. For the pie crust, also cut out a mini heart from the center.
 Arrange your apples, oranges, or other fruit in the cupcake tin, sticks or poky things facing down.  Cup the fondant circles over the fruit. Let stiffen several hours or overnight.


For the pie crusts, from the rolled out fondant, cut out mini hearts (you'll need about 15 per round, depending on the size of your cutters. Yes. This is tedious.) Dab a dot of light corn syrup on the back of a mini heart using a toothpick and adhere to the stiffened dome of fondant. Let dry well.
 step four: make the cherry
Knead drops of red coloring into fondant to make red. Roll a ball of fondant then insert a little piece of pull n' peel Twizzlers.
step four: assemble your cookie "pie"
Place dried cookies in a cupcake liner. For best results, double or triple line the cupcake liners. Rest the dome on top. For the cupcake, place the cherry on top (secure with a dab of light corn syrup if you like). That's it!


Thank you to Cheryl and to all her readers for having me visit!  I hope to stop by again soon. Maybe by the next time I'll take inspiration from Cheryl's amazing creations and actually pick up some needle and thread and give sewing a whirl!
Meaghan

Thanks for the tasty treats Meaghan!!

LinkWithin

Related Posts with Thumbnails