October is always a flurry of costume making around here, but I'm pleased to say I've got them done in time and ready to share before the big day (which is always tricky for me!). Last week I shared my Mad Scientist wig tutorial, but today I've got another fun one - our DIY Fleece Monarch Butterfly.
This fleecy costume is warm and cuddly to wear, thanks to handmade fleece clothing underneath plus the all important fleece wings that double as a cape (no coat required!):
This gives a busy butterfly plenty of time for what matters, like looking for milkweed:
Our little monarch just loves pollinating too:
And of course the look wouldn't be complete without some fuzzy antennae:
There are a lot of butterfly costume tutorials out there, but we wanted to make one that was warm, going to last beyond one night, look pretty close to the real thing and, in my case, not going to take forever to make.
~~How I Made My Butterfly~~
Materials:
- Black anti-pill fleece 1-2yds*
- Orange anti-pill fleece 1/4-1/2yd
- White anti-pill fleece 1/4yd
- No-roll 1 inch elastic 1yd
- Spray adhesive
- Paper or Tracing paper
- Black headband
- Pipe cleaners
- 2 inch black pom poms
Note: I only had 1 yd of black fleece on hand to cut both layers. I was not about to drag back to the fabric store for the umpteenth time to buy more, so I was determined to make that sizing work. She's a petite 7yrs, so it ended up fine. *For larger bodies, the wings should probably be wider, which would mean getting 2 yards.
I started by using my paper to draw a loose butterfly shape to fit my folded fabric, so my shape was about 28 inches at the widest and about 23 inches high (since my paper wasn't wider than that). Folding the paper in half while cutting guaranteed a nice symmetrical shape. I laid that over my folded fabric and cut around it with a really wide allowance so the final fabric pieces were 30 inches wide by 25 inches high. I also cut a rounded body tail at the bottom and a curved neckline so the wings wouldn't droop there when worn.
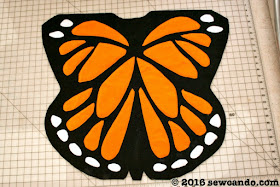
I did the same with some folded white fleece, so when done I had the perfectly symmetrical pairs of segments and spots.
In order to place the segments in the exact spots on the black fleece, I replaced the main paper pattern on top and then placed the new colored pieces in the cut out spots.
After a quick match up, all the butterfly markings were in place. To keep them there before sewing, and prevent any shifting while sewing, I peeled them up a bit and sprayed the backs of them with basting adhesive and pressed them down. It worked great:
I then sewed all the pieces in place by topstitching. This took the most time, but is worth it.

Gluing can't always withstand movement and weather and the last thing you want is a costume falling apart on the big day:
I made arm bands with the one inch elastic by measuring my daughter's arms around the should and lower arms and cut a pair of elastic strips for each respectively. I made them into loops and stitched them to the solid black side of the wings
They were spaced so the inner pair were at the shoulder and the outers right at the wing edges:
For the antennae, we got a cheap black headband and I took pipe cleaners, folded them in half, and then twisted them around the headband, stopping about 3 inches from the ends.
It was a lot easier just twisting, rather than trying to glue them and they've totally stayed in place as she's worn them.
I also made the fleece top and pants for our costume. Finding basic black sweats in her size was surprisingly challenging, and with our chilly evening weather, she needed something pretty warm to go under the wings. A big pouffy colorful coat wasn't going to cut it. Instead I used McCalls 7379 to make a fleece raglan top and the pants pattern from Simplicity 5809 to make some matching bottoms that didn't have outward side seams and would be roomy enough for pajama underneath.
The wings just slip right on over the clothing and the full costume is ready to go, so a busy butterfly to take flight:


This is super cute!!
ReplyDeleteThanks so much Shannon!
DeleteThis is a beautiful costume!
ReplyDeleteThank you Anita. I wasn't sure how well it would turn out when I was working, but I think I love it a little more every time she puts it on (it's been worn several times already!).
DeleteWhat an Amazing & Awesome costume!!! Your are sooooo Creative!! and you lil' butterfly is Adorable!! Have fun!! :)
ReplyDeleteThanks Lori. She's very excited about it, so we definitely will:)
DeleteMy daughter has a non-fleece version of Monarch Butterfly wings - I love this warmer costume idea. This is great!
ReplyDeleteBest,
Bibi
When you live where it could easily be 60 degrees one year or it might snow the next, the costume has got to be warm!
DeleteHow cute!! Thanks so much for linking up at #AThemedLinkup 2 for All Things Halloween.
ReplyDelete