Sunday, December 30, 2018

Share Your Best of 2018 Craftastic Monday Link Party


2018 is almost over!  I hope everyone who celebrated had a blessed and Merry Christmas. My new year's plans are to just take things easy thanks to an after-holiday virus knocking me out for past few days.  Getting dressed has been my biggest achievement most days. Since looking at pretty things online is about all I can muster, I'd love if you'd give us all some crafty eye candy and link up all your favorite projects of 2018.  Link as many as you want.  Let's end this year with some great crafts!

~~~~~~~~~~~~~~~~~~~
Now let's see the 
Last Craftastic Picks of 2018!

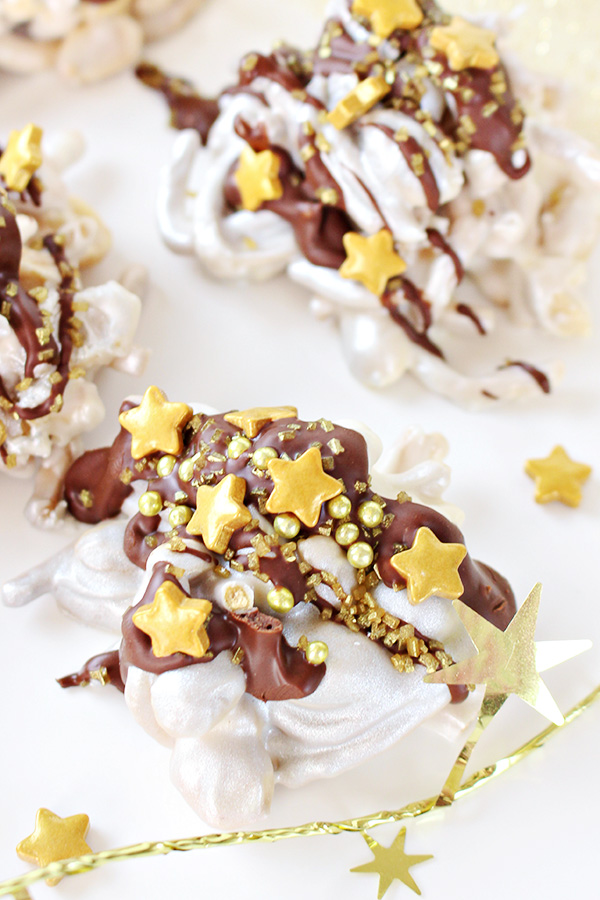
Homecooking Memories shared the recipe for these shimmery no bake New Year's Eve haystack treats.  I love the sparkly edible stars!


Our Clover House made this festive DIY Christmas sign:


Second Chances By Susan had an incredible sewing transformation by turning a shapeless oversized dress into this lovely number:


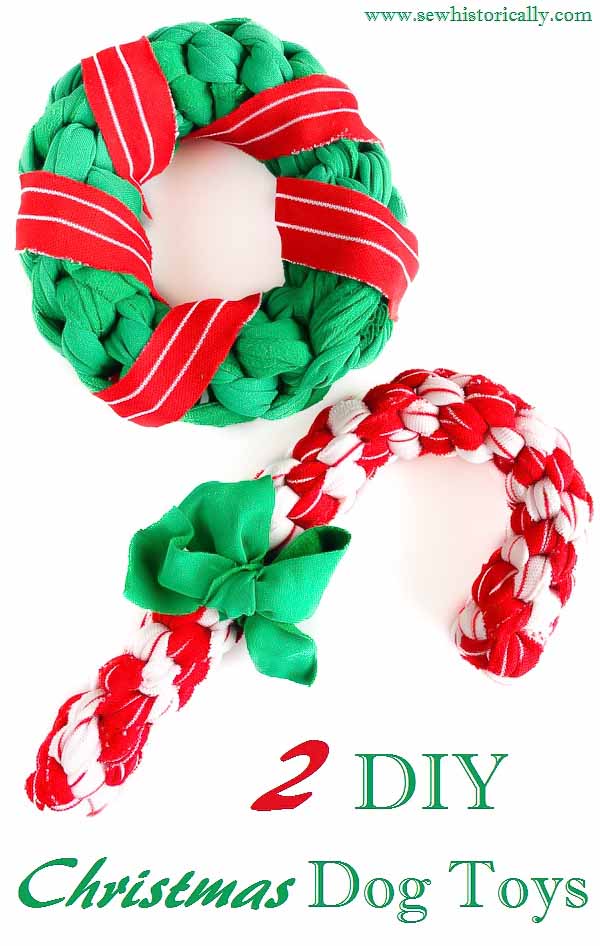
Sew Historically shared how to make these fun Christmas dog toys from fabric scraps.  I'll be honest, we don't have dogs, but my kids would love these:


If you're one of this week's features, be sure to grab my Featured On button over on my Buttons Page to share the good news. 

 
Want a Chance to 
Be Featured Next Week?  

Link back to the party somewhere on your blog.
I can't feature your post if you don't share the party.  
  
I also feature these projects on Sew Can Do's Craftastic Picks Pinterest board 
AND share each of them on Twitter too for even MORE exposure for YOUR blog!

Follow me there to see more great projects (and see if yours is one of them)!   

On Twitter: 
On Pinterest: Sew Can Do

Ready to link up your crafty creations?
 
Party rules are simple: 
  • As long as it's crafty, and made by you, it's Craftastic (no links to shops, link parties or other people's work).  Add the link to your specific post. Product reviews, plagiarized or sponsored posts for random items will be immediately deleted.  
  • Grab my party button & put it on your post, party page or blog somewhere.  If you want the chance to be featured, this is key.  The button code can be found HERE.
  • Check out some of the other fabulous links and share some crafty comment love.  We all love getting comments!!

Have a safe & Happy New Year!


    An InLinkz Link-up
   

Sunday, December 23, 2018

A Very Merry Christmas Craftastic Link Party


Merry Christmas Crafty Friends! Come get in the holiday mood and link all those favorite Christmas and seasonal projects.  New and old are both welcome - link as many as you want.  We've got some great features to help get things going.  

Last week I shared my FREE download pattern & tutorial for my personalized Classic Christmas Stocking:

~~~~~~~~
It's still the holiday shopping & crafting season, so get some FREE promotion for your blog or small business, by heading over to Facebook for the Sew Can Do Craftastic Mixer:
   

Share your blog or handmade/craft-related business or its Facebook page.  A new one posts every Sunday night on the Sew Can Do Facebook page at 5pm EST.
~~~~~~~~~~~~~~~~~~~
Now let's see those Craftastic Picks!

Sparkle Living shared these gorgeous & surprisingly easy gold leaf Christmas trees: 


The Blue Elephants made this charming free pattern Ollie the Elf toy.  I love the hat!


Abbotts At Home had this clever DIY tree box stand that also doubles as an ornament storage container - brilliant!


Happier Than A Pig In Mud offered up this yummy gum drop spritz cookie recipe:


Haekelfieber created this fun crochet cuckoo clock:


The Scrap Shoppe shared how to create this fabulous chocolate Merry Christmas cake topper:


If you're one of this week's features, be sure to grab my Featured On button over on my Buttons Page to share the good news. 

 
Want a Chance to 
Be Featured Next Week?  

Link back to the party somewhere on your blog.
I can't feature your post if you don't share the party.  
  
I also feature these projects on Sew Can Do's Craftastic Picks Pinterest board 
AND share each of them on Twitter too for even MORE exposure for YOUR blog!

Follow me there to see more great projects (and see if yours is one of them)!   

On Twitter: 
On Pinterest: Sew Can Do

Ready to link up your crafty creations?
 
Party rules are simple: 
  • As long as it's crafty, and made by you, it's Craftastic (no links to shops, link parties or other people's work).  Add the link to your specific post. Product reviews, plagiarized or sponsored posts for random items will be immediately deleted.  
  • Grab my party button & put it on your post, party page or blog somewhere.  If you want the chance to be featured, this is key.  The button code can be found HERE.
  • Check out some of the other fabulous links and share some crafty comment love.  We all love getting comments!!

Have a blessed & beautiful Christmas!


    An InLinkz Link-up
   

Tuesday, December 18, 2018

FREE Pattern: Classic Christmas Stocking


It's our baby's first Christmas and that means an extra stocking to hang.  It only seemed fair I'd make one for our littlest guy since his big sister has a handmade one from hers (the older kids were pre-Sew Can Do skills).  

I whipped this up last minute, but it's got a personalized embroidered cuff that's nice and plush, with a hint of silver sparkle:


And a full sized body that holds its shape well, even when filled.


Plus the added bonus of beautiful Christmas angels to make it festive & faith-filled.


I wavered between a whimsical design or going traditional. I even asked for some input on the Sew Can Do Facebook page to help figure it out, and ultimately decided on traditional.

Having a classic stocking that he won't outgrow seemed like a smart idea and I loved the idea of using this vibrant angel print and adding a plush cuff.


Make a classic Christmas stocking that can be used year after year and by choosing a faith-themed fabric like our Silent Night Angels, it adds more of the Christ in Christmas message!


I'm so pleased with how this turned out I had to make it into a FREE pattern for everyone!  

Materials:
- My FREE Christmas Stocking Pattern HERE
- 1/2 yd cotton fabric (mine is Silent Night Angels)
- 1/4yd fleece (mine is luxury fleece with metallic specks)

- 1/2 yd fusible fleece or batting- 8 inch strip of double fold bias tape or ric-rac
- Heavy duty needle

Optional - if machine embroidering - cutaway & water soluble stabilizers

Finished Size: 10in wide by 17in high

Download the pattern and print at 100% scale.  Measure the printout against the 1 inch sets box to confirm sizing is correct.  Cut out all 3 pieces and tape together at tops & bottoms as indicated.

While fabric is folded, cut two pairs of stockings for outside and lining


Cut a 9 inch high x 17 inch wide rectangle from the fleece for the cuff.  If machine embroidering a name on like I did, cut a piece of cutaway and water soluble stabilizers each in the same size.  The cutaway will be hooped under the fabric, the water soluble will be floated on top (using a little spray adhesive).  The top left quadrant of the fabric is where the name will be.


Mark center based on size of lettering and embroider the name on.  Peel away the top stabilizer and cut the excess away from the back. Hand embroidery or heat transfer are other options for personalizing.


To make the cuff, fold fleece with right sides facing short ends together.  Stitch with a 1/4 inch seam allowance.  


Bring raw edges together with the name side facing out.


Let's switch to the stocking body now.


Affix fusible fleece or batting onto the wrong side of the outer stocking pieces.  Fusible fleece can be ironed on, if using batting, add some spray adhesive to hold it in place.  


Place stocking pairs together, right sides facing and pin around sides.  


Stitch with a 3/8 inch seam allowance.  Clip or pinking cut around the curves to make them easier to turn.  


Turn outer stocking right side out and press.  Insert lining stocking into outer and baste together along the top. 


Baste the raw edges of the cuff together.


With raw edges of cuff and stocking facing, match up side seams and pin through all layers.  Stitch together.


Fold the raw edge downward and top stitch all the way around.  It will look like this on the inside:


Fold cuff down on the outside, just shy of the seam. If using bias tape, stitch open side closed.  Fold bias tape in half and stitch it to the inside of the stocking cuff by the seam.  


Now the stocking is ready to hung by the chimney and wait for Santa to fill it!


Merry Christmas!


Sunday, December 16, 2018

All the Christmas Craftastic Monday Link Party!


Hello crafters!  Christmas is a week away - are you ready?  I'm still working on projects, shopping, wrapping and wrangling the kids and still taking moments to reflect this last week of Advent.  It's a great time for last minute inspiration.  Come link all those Christmas and seasonal projects.  New and old are both welcome - link as many as you want!

Last week I shared my tutorial for this Fluffy Yarn Reindeer Decoration.  A great & thrifty last minute project anyone can do:

~~~~~~~~
It's the Christmas shopping season!!  Get some FREE promotion for your blog or small business, by heading over to Facebook for the Sew Can Do Craftastic Mixer.  Support small and handmade by visiting a few new places too:
   

Share your blog or handmade/craft-related business or its Facebook page.  A new one posts every Sunday night on the Sew Can Do Facebook page at 5pm EST.
~~~~~~~~~~~~~~~~~~~
Now let's see those Craftastic Picks!

Homecooking Memories showed us how to make these yummy gingerbread house milkshakes.  They look incredible!


Winding Road Crochet shared this free pattern for an on-trend buttoned buffalo check plaid cowl:


Turtles and Tails created these winter wooden candle holders from 4x4 wood scraps:


Low Carb Delicious shared how to make this delicious sounding air fried buffalo cauliflower.  Totally making this during the holidays:


If you're one of this week's features, be sure to grab my Featured On button over on my Buttons Page to share the good news. 

 
Want a Chance to 
Be Featured Next Week?  

Link back to the party somewhere on your blog.
I can't feature your post if you don't share the party.  
  
I also feature these projects on Sew Can Do's Craftastic Picks Pinterest board 
AND share each of them on Twitter too for even MORE exposure for YOUR blog!

Follow me there to see more great projects (and see if yours is one of them)!   

On Twitter: 
On Pinterest: Sew Can Do

Ready to link up your crafty creations?
 
Party rules are simple: 
  • As long as it's crafty, and made by you, it's Craftastic (no links to shops, link parties or other people's work).  Add the link to your specific post. Product reviews, plagiarized or sponsored posts for random items will be immediately deleted.  
  • Grab my party button & put it on your post, party page or blog somewhere.  If you want the chance to be featured, this is key.  The button code can be found HERE.
  • Check out some of the other fabulous links and share some crafty comment love.  We all love getting comments!!


    An InLinkz Link-up


Friday, December 14, 2018

Fluffy Yarn Reindeer Decoration Tutorial


I don't know about everyone else, but I'm definitely short on time this Christmas season. The days are counting down so fast and there's still loads to do.  This is when the Christmas crafts need to be pretty quick & easy.  Enter: The Fluffy Yarn Reindeer.


I'd seen yarn wrapped trees and a few reindeer here & there, but they all had a children's arts & crafts, rope-y look and even the slightest imperfection was really noticeable.  I wanted our reindeer to look a bit magical and what could be more fantastic than fluffy, shimmery antlers?


With his cherry red nose and snowy texture, he's an elegant Rudolph:


The best part? It's simple to make, doesn't require loads of materials and is inexpensive.  My craft win trifecta.  I didn't even have to leave the house because I had all the gear just sitting around in my craft hoard stash.  Which is good since I don't have time to run to the craft store all that often these days.


Materials:
- Papier mache reindeer (or tree/whatever shape you like)
- Skein of eyelash yarn 
- Tacky glue & hot glue
- Red shank button & satin ribbon
- Optional, but helpful, acrylic paint in the color of the yarn

The first part is optional, but key if you're a perfectionist type.  Add a bit of acrylic craft paint to the areas that are more challenging to cover.  This helps camouflage any gaps.  In this case it was the pointy ends of the antlers.  If I were doing this all over I'd probably paint the entire thing, but I was short on time so I just did a few choice spots.


I found starting at the antlers was the easiest with the yarn.  Dabbing a bit of glue along the upper area, I laid a bit of yarn over the antler tip and wound the yarn around about an inch down.  I did it a few more times to get the tip covered and then wound downward and moved to the other antler, loosely going upward and winding in more tight rows on the way back down.


Spread more of the tacky glue around the muzzle area


Then start winding from the antler area to around the mouth:


Wind around the area and then back around from the neck to the tip of the muzzle to get full coverage and then start looping it around the ears.  Dabs of hot glue here & there help keep the yarn from slipping off.


Work down the neck and then start wrapping around the center and then front to back to get the entire midsection covered well:


Then wrapping down one leg and adding a dab of hot glue at the hoof and cutting the yarn. I glued a new strand at the top of each of the remaining legs and wound down finishing them the same way.  Using a pin, I pulled loose some the the eyelash strands than got matted down with all the winding to fluff him up a bit.


For some added detailing, I ground off the shank of a cherry red button and hot glued it on for a nose.  Adding a nose was my daughter's idea and it really added the right touch.


I tied a satin ribbon bow around his neck and our fluffy fantasy reindeer was complete.


This little fella is ready to bring some wintery cheer to a special spot in our home.  Mantel, side table, table centerpiece, he can go anywhere!


Merry Christmas!


LinkWithin

Related Posts with Thumbnails